Basics


Home 
Polymerclay 
Styropor 
Basics 
Hollow forms 
Round forms 
Courses 
Links 
Entries 


Modelling

It’s necessary to make the clay smooth and loose by kneading so that all air disappears from the clay and the clay will become smooth using your body heat (do not place the clay on the heating or in the sun, since that will cause the clay to become more granular). Especially Fimo Classic stays granular.
For kids Fimo Soft or Creall-therm junior will be easier to use.

To make i.e. Fimo Classic easier to use you can add MixQuick. This is a special kneading medium (it looks like any white polymer clay), which does not affect the colour of your work piece.

It’s not recommended to knead all of one colour at once, knead the clay in 
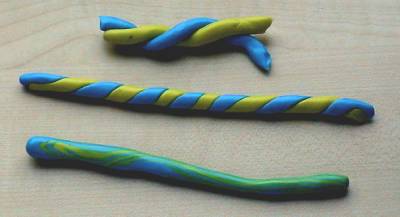
two or more parts, it will be easier and quicker to mould. Make rolls of the clay and braid them, roll again and repeat this.
 

Mixing
You can use the above-mentioned theory for mixing more than one colour, i.e.:

circle03_green.gif red and yellow makes orange
circle03_green.gif red and green makes brown
circle03_green.gif blue and red makes purple
circle03_green.gif black and white makes grey

You can of course mix all colours, Fimo and Creall-therm alike. By using other quantities you will obtain beautiful shades.

Pastels
By adding more white or yellow you can create pastels. Have a try at it yourself

Candy cane effect
Twist two rolls of different colours; roll this short and carefully smooth.

Marble effect
If you do not mix two or more colours entirely you will get a beautiful marble look. Do be careful with darker colours they are extremely dominating.

Polystyrene foam
Why do you use polystyrene foam?
ladybird_yellow.gif to achieve a nice form and to reduce the amount of expensive clay
ladybird_yellow.gif to get nice hollow forms.
You will consume less clay if you use a polystyrene foam form as a core; another positive effect is the weight after baking.
For hollow forms is it a must to use polystyrene foam. The form shrinks when you do not cover it with tin foil. Because of this you can easily retrieve the ball or other form (and use it again as core of a round form).

Take care to bake the workpiece within a day, as the plastisizer of the polymer clay will eat into the polystyrene foam.

Tin foil
Cheap and easy to handle material to use as core or covering.
Especially handy to use with round forms.

Basic forms
Have a try at the following first, after which modelling will gradually become easier. 

ladybird_yellow.gif  Ball; roll the clay between your hands and make a ball (several sizes)
ladybird_yellow.gif  Egg; roll a ball but put a little more pressure on one side. Make it smooth.
ladybird_yellow.gif  Drop; make a sharper point at the egg with thumb and index finger
ladybird_yellow.gif  Flat cone; flatten the drop at one side on your desk or table
ladybird_yellow.gif  Roll; used many times for i.e. arms, legs. More pressure (but also more time to roll) results in a thinner roll.
ladybird_yellow.gif  Barrel; flatten both sides of a roll (thick one).


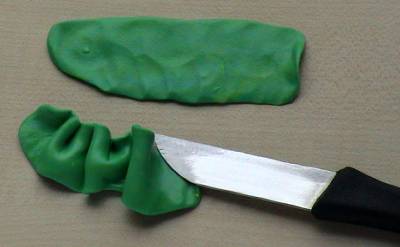
Creasing and Folding
You often use this method for clothing (dresses, coats etc.). You need a thin roll of clay, which you flatten in even layers.
The thinner the more beautiful creases you get. Use a kitchen knife or a sateprikker to lift a crease, put it layer over layer.
ladybird_red.gif Please have a look at the pictures on my
Fimo-frutsels site.

Library
There are a lot of books to chose from.

First try some simple forms, like I mentioned above. You will see that the more you practice the more fun you get out of this marvellous hobby. After this you will be able to experiment yourself.

Good Luck!


PolymerclayStyroporBasicsHollow formsRound formsCoursesLinksEntries

Copyright(c) 2003-2015 Fimodreams / Els Bleijenberg. All rights reserved.
Email Me / www.hobbysite.info